mount.davfs

このサイトはロリポップのレンタルサーバーを利用していますが、そのロリポップではWebDAVが利用できます。davfs2を使うとWebDAVを通常のファイルシステムのようにマウントして使えるので非常に便利です。注1

インストール

Gentoo Linuxを使っている場合はPortageを使ってインストールできます。他のディストリビューションを使っている場合も同様なパッケージ管理システムが利用できると思います。

emerge net-fs/davfs2

davfs2の設定

rootでマウントしてもいいと思いますが、一般ユーザーでマウントできるように設定してみました。

/etc/fstab

https://******.webdav-lolipop.jp/ /mnt/[マウントポイント] davfs user,noauto 0 0

******の部分はアカウントに合わせて変更します。

davfs2の使い方

$ mount /mnt/[マウントポイント]
Please enter the username to authenticate with server
https://******.webdav-lolipop.jp/ or hit enter for none.
  Username: ******
Please enter the password to authenticate user ****** with server
https://******.webdav-lolipop.jp/ or hit enter for none.
  Password:

ユーザー名とパスワードを聞かれます。ロリポップを使う場合は、ユーザー専用ページのアカウント情報より確認してください。

WebDAVhttps://.webdav-lolipop.jp/
FTP・WebDAVアカウント******

アンマウントも通常通りumountとできます。

$ umount /mnt/[マウントポイント]
/sbin/umount.davfs: waiting while mount.davfs (pid 31080) synchronizes the cache .. OK

ロリポップWebDAVの注意

詳しいことは分かりませんが、WebDAVにファイルを書き込めない問題注2があったのでdavfs2.confに以下の設定を追加しています。注3

/etc/davfs2/davfs2.conf

use_locks    0
if_match_bug 1

注1 CurlFtpFSを使うとFTPを使って通常のファイルシステム同様にマウントができます。WebDAV非対応のサーバーを利用している場合はこちらがおすすめです。

注2 cannot create regular file : File exists

注3 Box.comでも同じ状況になっているようです。
Pythonのtypesとassert

Pythonで型チェックの方法です。

types

型の取得には組み込み関数typeを使います。

>>> from types import *
>>> type(1) == IntType
True
>>> type('') == StringType
True
>>> type([]) == ListType
True

assert

C言語など他の言語と同様Pythonにもassertがあります。
assertの直後に評価したい式を書きます。

>>> assert True
>>> assert False
Traceback (most recent call last):
 File "<stdin>", line 1, in <module>
AssertionEror

型チェック

typesassertを組み合わせて型チェックができます。

>>> x = 1
>>> assert type(x) == IntType
>>> try:
...   assert type(x) == StringType, 'type error'
... except AssertionError, e:
...   print(e.message)
...
type error

注) この記事はPython2向けの内容となっています。

Python3ではtypesの代わりに

>>> type(1) == int
True
>>> type('') == str
True
>>> type([]) == list
True

のような感じで使えます。

ちなみに、intstrlistなどに使える値は

print([t.__name__ for t in __builtins__.__dict__.values() if isinstance(t, type)])

で一覧表示できます。

参考リンク

python – List of classinfo Types – Stack Overflow
https://stackoverflow.com/questions/51567356/list-of-classinfo-types

PythonでLibreOfficeのマクロ

LibreOfficeのマクロはLibreOffice BASICが標準ですが、Pythonを使ってマクロを書くこともできます。

LibreOffice Calcの簡単なサンプル

シートとセルを選択して値を読み書きするだけのスクリプトです。

def sample():

ここで定義する名前がLibreOffice Calc上でも表示されることになります。

doc = XSCRIPTCONTEXT.getDocument()

シートの選択

名前から選択する場合

sheet = doc.getSheets().getByName('Sheet1')

インデックスから選択する場合

sheet = doc.getSheets().getByIndex(0)

アクティブシートを選択する場合

sheet = doc.CurrentController.getActiveSheet()

値の読み書き(数値バージョン)

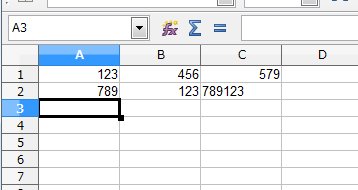
A1B1のセルの値を数字として読み取って、その値をC1に入力します。

# C1 = A1 + B1
A1 = sheet.getCellRangeByName('A1')
B1 = sheet.getCellRangeByName('B1')
C1 = sheet.getCellRangeByName('C1')
C1.Value = A1.Value + B1.Value

値の読み書き(文字列バージョン)

左上を(0,0)としたインデックスからセルを選択して、その値を文字列として扱います。

# C2 = A2 + B2
A2 = sheet.getCellByPosition(0, 1)
B2 = sheet.getCellByPosition(1, 1)
C2 = sheet.getCellByPosition(2, 1)
C2.String = A2.String + B2.String

指定したセルの値を読み書きするサンプルコード

#!/usr/bin/env python
# -*- coding: utf-8 -*-

def sample():
  '''
  数値としてA1 + B1の値をC1に代入
  文字列としてA2 + B2の値をC2に代入
  '''

  doc = XSCRIPTCONTEXT.getDocument()

  # シートを選択
  #sheet = doc.getSheets().getByName('Sheet1')
  #sheet = doc.getSheets().getByIndex(0)
  sheet = doc.CurrentController.getActiveSheet()

  # C1 = A1 + B1
  A1 = sheet.getCellRangeByName('A1')
  B1 = sheet.getCellRangeByName('B1')
  C1 = sheet.getCellRangeByName('C1')
  C1.Value = A1.Value + B1.Value

  # C2 = A2 + B2
  A2 = sheet.getCellByPosition(0, 1)
  B2 = sheet.getCellByPosition(1, 1)
  C2 = sheet.getCellByPosition(2, 1)
  C2.String = A2.String + B2.String

実行結果